Miraculous NINE

We have come a rather long way- 9 years in marriage to be exact with 2 beautiful boys. Each year you will celebrate the day with me in your best possible way which always never fail to bring a smile on my face.

Our 2 Lovely Boys

This year is a no doubter too. I enjoyed our very late lunch at my favourite place again, the movie (though it was an all-boys movie) & the super huge dinner (which was totally AWESOME). 

Dinner @ Texas Road House

Dinner @ Texas Road House

But I guess you will have to agree with me that nothing beats the gift that’s bestowed upon us unexpectedly as a mark of our 9th year wedding anniversary (which is gonna to make our 10th even more special). 🙂

In Anticipation

In Anticipation

Happy 9th Wedding Anniversary !!

(with many more years to come 🙂 )

Christmas Bake: Cherry Vanilla Pound

I know in Singapore it’s already Boxing Day today. Hope everyone had a fun time. Anyway it’s still Christmas here in Idaho. A tad boring for us since we have some travel restrictions and are still in the midst of settling down (so we’re kind of stuck in here at home).

Cherry Vanilla Pound Cake

Cherry Vanilla Pound Cake

This is my FIRST bake since I’ve arrived. I can no longer wait for my boxes. I have to start using the Kitchenaid that my hubby got for me as an early Christmas present. I just need to bake something………….

Early Christmas Pressie from Hubby :)

Early Christmas Pressie from Hubby 🙂

So I bought some disposable aluminium loaf-pan foil. Can’t imagine that I got so excited about it and was already wide awake at 5.30am.

CVP-2

Servings: 8 slices

Ingredients:

  • 150g Cake Flour (Sifted twice)
  • 150g Unsalted Butter (Room Temperature)
  • 100g Caster Sugar
  • 3 Egg Yolks
  • 1/8 tsp Baking Powder
  • 1/4 tsp Salt
  • 1 tsp Vanilla Extract
  • 120g Frozen Dark Sweet Cherries
  • French Meringue: 3 Egg Whites & 30g Caster Sugar

Preparation:

  • Sift the flour and baking powder.
  • Prepare 8″ x 3 3/4″ x 2 1/2″ Aluminium Loaf-Pan
  • Preheat oven to 170°C/335°F

Method (with step-by-step photo) 

  1. Cream the butter to incorporate air till pale yellow.
  2. Add sugar and salt, whisk till light and fluffy(mayo-like texture).
  3. Whisk in egg yolk one at a time.
  4. Mix in the vanilla extract.
  5. Prepare french meringue in a clean mixing bowl (To read up on how to whisked up meringue, click here).
  6. Fold in 1/3 meringue into butter mixture.
  7. Fold in the sifted flour & baking powder quickly till it just disappear into the butter mixture. DO NOT OVERMIX as you will end up with a tough & dense sponge.
  8. Fold in remaining meringue quickly.
  9. Mix in the frozen dark sweet cherries.
  10. Fill up the loaf-pan 3/4 full.
  11. Bake at 170°C/335°F for 60mins or when skewer comes out clean.
  12. Cool down before serving.

CVP-5

Oh and did I mention that I love baking in this winter because cakes and cookies can get so quickly cooled down just by opening a slight bit of the window. 🙂 A total natural cooler!!

Getting a blast of Cold Air

Verdict: Strong hint of vanilla (which I totally love) and the tanginess of the dark cherries balances out the sweetness of the cake. As usual the body of the cake moist and tender. 

Relocating to Idaho

It’s more than 2 months since I updated this blog. Nope…… I have not abandoned this site. It’s just that we have been busy relocating to Idaho as I’ve mentioned here (also the reason for starting this blog).

We’ve been here for slightly more than a month and we’re already more or less settled down (with a miraculous surprise :)) . My boys have already started school and are enjoying themselves tremendously, I’ve already been put to work by my employer (aka my hubby) with only a pot and a pan. As for my hubby, he was soon to put to work too :).

My Boys Totally Enjoying School

My Boys Totally Enjoying School

Now you must be wondering, “Where on earth is Idaho ?” and “How is the place like?”  Idaho is a land famous for their potato and it’s  a state in the northwestern region of the United States (Read here for more).

Well as for how much I like it, l really do not know. Perhaps because I have been under the vast blue skies and stepping on the luscious greens of the Great Down Under??? Perhaps because we had arrived during winter where everything seems dry, grey and brown??? It is really not a place to fall in love with at first sight. Looking at the above map of our location (we’re not near the coast), my BIGGEST pet peeve here is not being able to fresh fish here. Everything is either prepacked or frozen. Nothing at all like the supermarkets of Toowoomba (where we stayed in Queensland) or like the convenience of the Singapore’s (my hometown)  wet market or supermarket too where we can get fresh food all the time.

Luscious Greens & Clear Blue Sky @ Toowoomba, Queensland

Luscious Greens & Clear Blue Sky @ Toowoomba, Queensland

VERSUS

Greyish Blue Skies & Bown Grasses @ Mountain Home, Idaho

Greyish Blue Skies & Bown Grasses @ Mountain Home, Idaho

Having said that, though we have not been to any place of interest yet, we’re very lucky to have a good size of the Singaporean community here. Not to mention that our sponsor (someone who takes care of us till we’re settled down) is ONE OF THE BEST. From mobile lines to our mode of transport to housing basic necessities to food, he really did a fast and great job. 

Best Sponsor in TOWN!!

Best Sponsor in TOWN!!

By now other than cooking our basic daily food, I have not yet done any baking yet. However there are times we have been eating out and I do have a few favorites now. I will share them with you in time to come that’s because I’ve not been very hardworking with my camera too. 🙂

Cheesecake Factory @ Boise. By far my favourite restaurant. Never fails to impress + SUPERB Service

Cheesecake Factory @ Boise. By far my favourite restaurant. Never fails to impress + SUPERB Service!!

That’s all for now folks and have a great day. 🙂

Family

Also WISHING YOU GUYS A VERY MERRY CHRISTMAS in advance 🙂

Chocolate Chip Cookie-Top JUMBO Muffins

I always always have a soft spot for for huge top muffins or what my hubby calls it as ‘mushroom-top’ muffins because of its overflowing crown which resembles a mushroom.

Look @ the arrows pointing to the muffin caps. Don't they look like mushroom top?

Look @ the arrows pointing to the muffin caps. Don’t they look like mushroom top?

I mean seriously who can resist these delicious looking things, calling for us to bite into them.You must be wondering why I name it cookie top muffins. This is because the bird’s eye view of these muffins really do look like chocolate chip cookies. Also with those crusted crown, it does indeed really taste like a soft cookie, crispy at the edge. With the egg-separation method the body of the muffin is tenderly moist and soft (even till the next day).

Doesn't the top look just like chocolate chip cookies?

Doesn’t the top look just like chocolate chip cookies?

These cookie-top muffins were so seriously good that my boys actually made me bake them for 3 consecutive days. So…. I have decided to place this under our Family’s Signature.

Here is how to make these lovely munchies. Totally AWESOME with a glass of cold milk or a cup of hot flora white tea. 🙂

CCJumboMuff-4

Servings: 6 Jumbo Muffins

Ingredients

  • 150g Top Flour
  • 150g Unsalted Butter (Room Temperature)
  • 100g Caster Sugar
  • 3 Egg Yolks
  • 1/8 tsp Baking Powder
  • 1/4 tsp Salt ( I use my favourite pink salt)
  • 1 tsp Vanilla Extract
  • 120g Chocolate Chip (put aside 3 tsp for the muffin topping)
  • French Meringue: 3 Egg Whites & 30g Caster Sugar

Preparations:

  • Line the muffin tin.
  • Preheat oven to 170°C.

Method (with step-by-step photo) 

  1. Cream the butter to incorporate air till pale yellow.
  2. Add sugar and salt, whisk till light and fluffy(mayo-like texture).
  3. Whisk in egg yolk one at a time.
  4. Mix in the vanilla extract.
  5. Prepare french meringue in a clean mixing bowl (To read up on how to whisked up meringue, click here).
  6. Sift in flour and baking powder.
  7. Fold in the flour quickly till it just disappear into the butter mixture. DO NOT OVERMIX as you will end up with a tough & dense sponge.
  8. Add in chocolate chips.
  9. Fold in 1/3 of the meringue. Fold in the remaining meringue quickly.
  10. Fill lined muffin tin with batter to the brim. This will give you a beautifully crusted crown.
  11. Top off the batter with 1/2 tsp of chocolate chips on each muffin.
  12. Bake at 170°C for 35mins or when skewer comes out clean.
  13. Cool on cooling rack.

CCJumboMuff-8CCJumboMuff-9CCJumboMuff-10CCJumboMuff-11

Verdict by Clemens (my eldest boy with a picky tongue):

  • Best eaten after it has cooled off from the oven immediately because that’s when the crown is the crustiest and the body- warm, soft and moist. Totally deliciously.
  • Great on the day itself because the top still feels like eating cookie with a moist and soft body.
  • Second day- Still good but abit nah……… because the crown is no longer as crusty as the 1st day. but the body is till moist and yummy.

If there is anything I love to bake these muffins, it’s also the baking process. Watching the batter rise to have a glory crown is indeed truly fascinating. Watch the magic unfold:

CCJumboMuff-5CCJumboMuff-6CCJumboMuff-7CCJumboMuff-2

The box of muffins Clemens had requested me to make for a special lady and a little girl. 🙂

Making French Meringue

I know and understand that I am suppose to write about the Chocolate Chips Cookie-Top Jumbo Muffins. However I decided to write on whipping the egg whites to make a French meringue (aka Common Meringue)  first because quite a number of my recipes uses the yolk and white separation method. Therefore it is really good to know.

Meringues are whipped egg whites sweetened with sugar. Frequently used for pie toppings and cake icings, they are also used to give volume and lightness to buttercream icings, mousses and dessert souffles.

French meringue (aka Common Meringue) is made from egg whites at room temperature, beaten with sugar. It is the easiest to make and rather stable due to the high percentage of sugar.

FM-1

Egg Whites Whisked to Stiff Peak

I also particularly like to use them in my pound cakes recipes, muffins recipes and of course chiffon (it is needed in chiffon anyway) because of the light tenderness it gives my cakes, the moist and I love how it doesn’t dry out when I keep my cakes out in room temperature even for a couple of days.

When I first started to self-discover the route to making meringue, I never knew that there was so much knowledge, details  to it and so much care that is needed to do it. I am by no means a professional to this topic but I believe what I know is self-sufficient as a home-baker.

Guidelines For Making Meringue

  • Fats prevent whites from foaming properly! Always use squeaky clean bowls. Any traces of grease/fat will prevent the whites from foaming well. I recommend using stainless steel or glass bowl as plastic bowl can harbour traces of grease. Also make sure there are no traces of yolk in the whites as yolk contains fat.
  • Egg whites foam better at room temperature! Always remove eggs from cooler 1 hour before whipping.
  • Sugar makes egg whites foams more stable. Meringues are thicker and heavier than unsweetened egg white foams. But egg whites can only hold a limited amount of sugar without sacrificing volume, so always follow the recipes.
  • Mild acids helps foaming. Therefore some recipes like the angel food cakes/ chiffon will call for a small amount of cream of tartar or lemon to be added to give the meringues more volume and stability.

Whisking French Meringue (with step-by-step photos)

  1. Crack the egg whites into a clean bowl. Make sure there are no traces of yolk. Yolk contains fat & it’ll prevent the egg whites from foaming well. Also put aside the precisely measured sugar in another bowl.
  2. Whisk the egg whites on medium speed. Pour 1/3 of your sugar from the side of the bowl when the liquid has turned to foam like a cappucino froth, . Turn the speed to High.
  3. Add the second 1/3 of sugar when the foam becomes finer and fluffy peaks start foaming.
  4. Add in the last 1/3 of sugar when the peaks are starting to get define, you can feel the resistance and the foam is shiny.

FM-3

Now that the meringue is done, it should have defining peaks, shiny to look and even when you overturn the bowl upside down, the meringue will not fall out. Just like this:

An overturned bowl of French Meringue.

An overturned bowl of French Meringue.

This stunt never fails to fascinate my kids. This gravity defying act is totally MAGIC to them. 🙂

Things To Note:

  1. Sugar substitutes are not useful in meringue.
  2. Always add the sugar 1/3 at a a time from the side of the bowl (not in the middle to prevent deflating the meringue) in the 3 stages peak formation: Soft, Firm and Stiff Peaks.
  3. Always use the meringue IMMEDIATELY as we do not want it to deflate. 

The Ever Versatile Dashi Stock

In my previous post on Mock Frog-Leg Congee, I have mentioned that I used the Dashi Stock to cook both the chicken and congee. Therefore I am sharing with you my Dashi stock recipe.

Dashi stock is a clear cooking stock, considered fundamental to Japanese cooking and all you need is 2 main ingredients- the konbu seaweed and the bonito flakes (I used the slices ones) to prepare it, although I also used the 3rd ingredient-the niboshi (dried baby sardines) all the time too.

Dashi-2

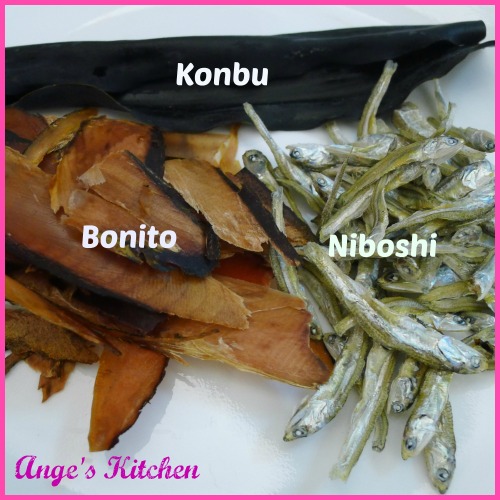
Niboshi (S$21 per 100g) is a few times more expansive than our chinese dried ikan bilis and it has a more distinct sweetness to it as well, where else  the chinese dried ikan bilis has a more plain saltish taste to it. However, I am always very careful when buying the niboshi. I never ever buy the off-shelves ones for the fear of it staying already too long the shelves thus causing it to turn slightly rancid with a strong smell of old musty oil (not sure if you get what I mean though?)- These will give you a nasty stock. I will usually wait for the Japanese Food Fare at Isetan Scotts. They will usually have aplenty of it, selling it by the weight, freshly packing it up and sealing it up in front of you. Most of all, I will always get to taste a couple of these dried fishes to make sure that they do not taste or smell rancid, and then I will stock it up and store them in my freezer. They stay for up to a good 1 yr in the freezer.

Anyway let’s come back to dashi stock. This is the stock that makes your miso soup, shoyu noodle broth, cold soba dipping sauce and I even use it as a soup base to cook our slice fish/ meat ball congee. And because it is so simple, so easy, so fuss free and most importantly OIL-FREE(also low-calorie) plus loaded with the calcium, minerals and iodine from the niboshi and konbu and the smoky aroma from the bonitos, this stock is a hell load of goodness for the women and growing children.

Below is my recipie that I am sharing.

Dashi-1

Servings: 2 pax

Ingredients Needed:

  • 500ml Water
  • 10g Niboshi, rinsed (optional to have)
  • 10g Konbu Seaweed, wiped with a damp cloth
  • 10g Bonito Flakes

Method (with step-by-step photos)

  1. Bring the niboshi and water to a boil.
  2. Place in the konbu and bonito flakes.
  3. Cover and let it seeped / soaked for 30mins-60mins.
  4. Strain and the stock is ready to use.

Dashi-3

See that’s how easy it is and usually by 30mins, the stock is already very flavourful. I have been making it so very often that the dashi stock is already an instant fix to cook noodles for supper when all my boys are calling out in hunger. Oh yes, do not be surprise that my boys do make me cook at 11pm at night, when I have already bathe, done my facial mask and all the nighlty routines. 😦 Spolit aren’t they? And because its that easy, I no longer feed my family with instant noodles (unless my hubby and I have a craving for it)

Now what I have shared with you is the ichiban dashi. This is known as the 1st stock where you use the stocks for miso soup or noodle broth. And because the ingredients are rather expansive here in Singapore, After straining out the 1st stock, I will usually add somemore hot water to re-extract more goodness out of the niboshi, kombu and bonito flakes already used for ichiban-dashi. This is known as the niban-dashi. This is good for stews and sauces. I sometimes even boil my broccoli and other greens in it to give it that smoky aroma.

I know you will ask me why so troublesome when there are instant packages of dashi granules around. I am seriously not sure how nice it taste as I have never used them before. But I know that some are also packed with MSG though you can try to look around for those MSG-free dashi powder. And also once you have made your dashi from scratch, it is so addictive that you might perhaps not look back again.

My World of Dashi Stock

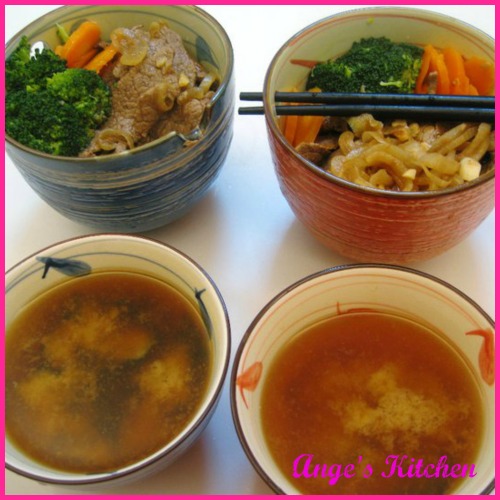
My hubby’s favourite wagyu beef bowl with miso soup

Dashi-6

 My boys’ favourite lava egg with somen in dashi stock with a dash of soya sauce.
Dashi-7
Wagyu congee cook in dashi stock to give that distinctive smoky favour.
Dashi-4
Totally YUMMY!!! I just LOVE Dashi.

Mock Frog-Leg Congee

My family loves the frog porridge at Lion City Frog Porridge especially my boys. However for $8.00 a frog and with such little meat, it can rather expensive when we bring our little troops out for supper.

Anyway one of the most similar meat to frog leg is actually the chicken thigh, so when the cravings kick in and our wallet is feeling not too generous, what do we do? Well, it is to CIY (Cook-It-Yourself). 🙂

It is not difficult to do this dish but a little tedious as we need to marinate and cook the chicken,  cook the congee separately and assemble them together.

Servings: 4 pax

A: Cooking The Chicken

Ingredients

  • 4 pcs Chicken Thighs (skinned & cut to bite size pcs)
  •  2tsp Fish Saucec
  • 2tbs Oyster Sauce
  • 2tsp Sesame Oil
  • 1tsp Dark Soya Sauce
  • a dash Pepper
  • 1tsp corn flour (only to be added before cooking)
  • 2 slices ginger
  • 4 segments of garlic clove (chopped finely)
  • 2 sprigs spring onion
  • 100ml Stock (chicken or dashi)
  • a splash of Chinese Cooking Wine

Method (with step-by step photos)

  1. Cut the chicken thigh meat into bite size pieces
  2. Marinate the chicken with fish sauce, oyster sauce, sesame oil, dark soya sauce and pepper  for at least 30 mins.
  3. Before cooking, mix in the corn flour.
  4. Heat oil and fry the ginger till fragrant.
  5. Add in garlic and fry till fragrant.
  6. Add in marinated chicken and fry till nearly cook.
  7. Add the splash of chinese  cooking wine to deglaze.
  8. Add in stock. Bring to a boil, then simmer till sauce thickens.  (water will do fine too if you do not have stock)
  9. Add in sprigs of spring onions for flavour and garnish.
  10. Plate and put aside.

CC-2CC-3CC-4

B: Cooking the Congee

Ingredients

  • 2.5 cups of Short Grains (approx 375g)- washed & rinsed
  • 1.5L of Water
  • 1L of Chicken/Dashi Stock
  • 1/2 ladle Sesame Oil

 Method (with step-by step photos)

  1. Rinse short grains rice till water runs clear (abt 3-4 washes)
  2. Bring to a boil and lower fire to medium. Give it a stir occasionally to prevent bottom from burning.
  3. When the liquid is starting to run low, add in the stock gradually(300 ml at a time), stirring it at the same time, till you get a smooth, thick consistency. Takes about 45 mins to 1hr.
  4. Add in the sesame oil and give it a good stir. (This makes the congee smooth.)

CC-5

Assemble

Spoon the congee into a bowl and top it off with the chicken and the sauce.

Things to Note:

  1. Its is very important to use stock to cook the congee as it is what it gives the grains the flavourful burst each time you put it in your mouth.
  2. No seasoning is needed in the congee as the sauce from the chicken already acts as a seasoning for the congee.
  3. The chicken dish does not necessarily needs to be eaten with the congee. it is really good with steam rice too.

Hong Kong: Chan Kee Roasted Goose (深井陳記燒鵝)

Who goes to Hong Kong without eating Roasted Goose? Definitely not us. It was a plan-in-advanced meal by my hubby as he LOVES his BBQ meat. So we started plodding from our hotel to the eating house but alas we went in the wrong direction again. Anyway after a few turns, here we are. 🙂

CHRGoose-1

The eating house was filled with people and we had to wait for a little but it was definitely worth the wait. Tender meat crispy skin and glistening fat, there’s really nothing not to love about it. In fact it was way better than the roasted goose that we had at a so-called famous restaurant when we visited Hong Kong 2 years ago. 🙂

CHRGoose-2

How to get there

Reclamation Street                                                                                                           427-427A Mongkok                                                                                                         Kowloon, Hong Kong                                                                                                    Tel: +852-2381-6161

CHRGoose-3Clemens being playful posing like those roasted pigeons

Hong Kong: Mui Kee Congee (妹記生滾粥品)

Last December(2012), we went on a holiday trip with my mother-in-law to Hong Kong for an eating & shopping spree. It was a free & easy trip with my hubby as the tour guide. 🙂 Armed with a guide book and a map, there we go. One of our favorite eats is definitely at this congee store at the local market. Mui Kee Congee (妹記生滾粥品).

MKC-1

Being not a local, this little gem was truly difficult to find. We thought that this was a eating house so after an hour of walking around and asking around, we only realized that its on the third level of the local wet market. But the time was all totally WORTH it. We started off with a plate of fish skin.

MKC-2

My hubby totally adores fried fish skin so when it turned out to be fresh fish skin he was rather put off by it. I was initially quite skeptical too. However my motto in life, “if you don’t try it now, when will it be. ” and this definitely cannot be compared with what Andrew Zimmern from Bizzare Foods puts in his mouth right? And that was it. I picked up a piece with some ginger shreds and put it in my mouth. I was blown over by it. Nothing like what I had imagined it to be (slimy & fishy). It was WELL MARINATED!!! Slightly salty and fragrant from the soya sauce and sesame oil, crunchy (I believe they had submerged it in icy cold water) and the freshness from the shredded ginger and spring onion. When submerged into the pipping hot congee, it became soft and tender. Fish skin eating has definitely been brought to an entire new level for me. I have never eaten fish skin prepared this way in Singapore before. I just simply love it.

MKC-3

The highlight is definitely the congee. Thick and silky smooth, every mouthful is such a delight.

MKC-4

Each time the congee glides down effortlessly down your throat, you will just like to follow up with an oooh…. and arrrr…….. It just brings me so much joy and cravings recalling it. Not to mention the generous helpings of ingredients in the congee, it is definitely good value for $$ (if you’re traveling on a budget). This congee is my mum-in-law’s favourite that till today, she can’t stop talking about it and asking when we can go again.

MKC-5

See her smiling face. 🙂 We tried the Mix Pork Congee, Fish Belly Congee, Meatball Congee. They were all seriously GOOOOOOOD…………….

The rice flour rolls are a must try. Too bad I was busy eating so no photo of this was taken (Managed to retrieve from my mum-in-law’s mobile :)). Soft and springy, it’s again nothing like I had eaten in my life in Singapore. I love the sauce mixture of sweet and salty. Especially the dash of sesame sesame sauce put in it, giving it a really fragrant touch. Imagine with your eyes close. The fragrance of sesame running amok through your nose lingering in there, the sweet and salty sauce playing through your entire mouth tingling on the tip and sides of your tongue. Bite into the soft, smooth yet springy rice flour rolls. The experience is truly sensational. I have truly and really fallen in love with the unseemly simple rice flour rolls. 🙂

How to get there

Fa Yuen Street Market, 3 Level                                                                                       Mong Kok , Kowloon                                                                                                           Hong Kong, China                                                                                                                 Tel: 852-27890198                                                                                                           (Nearest Train Station: Mong Kok MTR. Exit at D2 and walk to Fa Yuen Street Mkt (花園街). Head towards the end of the road.)

I am not sure if I have managed to convince you on how good is that but during our 5 days 4 nights in Hong Kong, we went there for breakfast twice. 🙂

Zesty Double Chocolate Chewy Cookies

Teacher’s Day is just round the corner falling on the 1st Friday. As usual the boys asked me to make their favourite chocolate chip cookies for their teachers as gifts. I thought chocolate chips…. how boring??? So I started pouring through my newly bought “GU Chocolate Cookbook“. For those who have liked me on Facebook-Ange’s Kitchen (Like me NOW if you have not) will know that I have purchased another 2 cookbooks to add to my collection recently.

Anyway I chance upon the Chewy Double Chocolate Cookies and as I read on, it got me excited that I can add the zest of an orange for that little subtle citrus flavour. So this was it.

ODCCCookies-1(adapted from Gu Chocolate Cookbook: The trick to making delicious chewy cookie is to make the dough the day before as the longer you leave it, the chewier the end result. If the dough is used straight away, you’ll have a crunchier cookie.)

Servings: 75 cookies

Ingredients

  • 150g unsalted butter, softened
  • 220g light brown sugar
  • 1 egg, lightly beaten
  • 1tsp vanilla extract
  • 220g flour, I used Top Flour
  • 4tbs cocoa powder, I used Valhorna
  • 1/2tsp baking soda
  • 3/4tsp baking powder
  • 1/8tsp salt (or a pinch), I used Himalayan Pink Salt
  • 270g chocolate chips
  • 1.5tbs orange zest, approx zest of 1 orange

Method (with step-by step photos)

  1. Cream the butter to incorporate air.
  2. Add sugar and salt, whisk till light and fluffy.
  3. Whisk in egg and vanilla extract.
  4. Sift in the flour, cocoa powder, baking powder and bicarbonate of soda.
  5. Fold in flour quickly till the mixture is well incorporated. Take care not to overmix.
  6. Mix in the chocolate chips and orange zest.
  7. Scoop them into 1tsp heap of dough balls.
  8. Place them on a bake tray and chill for at least 24 hours before baking.
  9. To store the dough,  freeze the raw ball dough in a single layer in an air tight container. This way you can keep the dough for up to 3 months.
  10. To bake, place the dough balls o the baking tray evenly space allowing the cookies to expand.
  11. Preheat oven to 170°C for at least 15mins. Bake the cookies for 14mins till crisp on top but still soft in the middle. Remove from oven.
  12. Transfer cookies to cool on wire rack.

ODCCCookies-2ODCCCookies-3ODCCCookies-4

There you have it. Beautiful, chewy double chocolate cookies with a lingering zest.

ODCCCookies-5

ODCCCookies-6

Verdict: My mum who usually don’t fancy chocolate, totally loves this cookie because of the gooey chocolate each time she takes a bit into it. And the lingering fragrance of the orange zest. (See the pink little arrow).

My Kitchen Experiments

For the 1st batch of test bakes, I was a little light handed with the orange zest (3/4 orange zest)for the fear of the citrus bring too over powering. It ended up not bringing out the orange in the cookie unless you savour it really leisurely and slowly

For the 2nd batch of cookies, I decided I will add the zest of the entire orange. That made the smell of orange stronger but not overpowering.

Bake straight from freezer (12 mins @170°C): soft, creamy & dreamy with not much crispy edge

**Bake straight from freezer (14 mins @ 170°C): Texture was the BEST. Cripsy at the edge, soft & chewy in the middle even after the next day.

Bake straight from freezer (16 mins @ 170°C): slightly hard with a crunch. A bit dry. The least preferred of all.

Final Product 🙂 (with the boys’ hand-made cards)ODCCCookies-7ODCCCookies-8

~~~~~~~~~~

Linking to:
Daily Dish Magazine